This first post is to give you a history of a true beginner's story and to bring you to the current day.

A friend of mine and I signed up at the local city recreation center and started attending stone carving class every Thursday night - 6 weeks.
Here I am with the instructor at my first class. He's laying out a Celtic Knot relief for me.
So I borrowed some of the instructors carving tools and began hacking away.
The first class ended and I never really finished that first project. But I learned how to layout a carving and more importantly how to stop cut an edge.
Several weeks later in an abandoned area of the basement in my 83 year old mother's house, I discovered this old wooden storage box.

Fearfully, I opened it (Grandma is still missing).
Inside - stone carving tools that belonged to my long-departed Grandfather on my father's side. Family legend has it that he worked as a stone carver in Chicago during the early 1900's and that he worked on several of the bridges over the Chicago River and maybe the Tribune Building(?). His name is stamped into several of the tools, but most them seem to be stamped with the names of other people.
Here are some of the rusty tools I found.

So armed with Grandfather's tools, I signed up for another class and started carving again.
2007
Frog with Legs (and tongue).
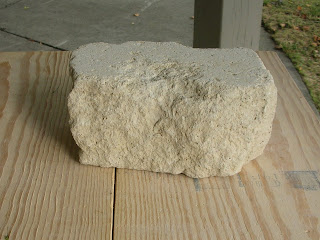
The second thing I made was a frog made from an irregular somewhat rectangular block of Indiana limestone.
This rock came from a local stone works where I found it on the scrap heap. They sell their scrap for $50/ton...just weigh your vehicle going in, load it up (make sure everyone that rode in rides out) and weigh your vehicle going out to calculate the weight - they have a truck sized scale.
The frog rock weighed about 20lbs. so it cost 50 cents.
I didn't set out to carve a frog, in fact, I didn't have an any ideas at all. But I sat there and looked at the stone for a while (it wasn't perfectly rectangular) and I started to see some outlandish frog legs...
May 3, 2007
.jpg)

May 24, 2007 - turns out that a frog's legs are a little different.


May 31, 2007


The finished frog...that's its tongue licking its eye by the way.
.jpg)
.jpg)
August 2007
Megan (the dog) Memorial
I was about finished with the frog and was trying to think of something to carve when a friend of mine was bemoaning the fact that his cocker spaniel, Megan, had just died. He of course had the dog cremated and was planning on burying the ashes outside under a tree with the help of his children.
I asked him if he would like a marker, at least I think I asked him. I think he agreed - he did give me pictures...
Well anyway, here's Megan the cockerspaniel made from a block of travertine, hence the texture. I tryed to portray her as just resting and the unfinished travertine gives it a certain dream-like effect.
This is the front and back of the raw rock...you can see the sleeping dog there.

Starting to find the general shape and the head.


The head is turning out a little high so I added a paw to rest on.


After some filing and sanding the final product.

Late 2007 - Spring 2008
Three Little Pigs
A very good friend of mine likes to go to the state fair every year. Strangely, her favorite thing (other than the food?) is to go to the swine house and watch the mother sow with her piglets. She (my friend) will spend hours there if you let her.
So I decided to carve a pile of piglets for her. Interestingly, it started out to be two piglets but I found the middle one as I was chipping away.
Here I'm half done - trouble with ears and eyes. I made several attempts at eyes but they didn't look right so I filed them down and tried again - the faces where starting to get too skinny so I finally just either covered the eyes with ears or left out the eyes entirely.


The tails turned out to be the subject of the entire piece...


So I think this is the best view of these little piggies.

April 2008 - Giant Ear
My baby sister, who is an audiologist, recently turned 50 years old.
So what better 50th birthday present for an audiologist than a giant ear?
The problem was I only had one week to get it done.
It started out to be a birdbath giant ear but it turns out it can stand up too...so it's still undecided if it's a birdpath (water tends to dissolve limestone) or simply garden "art".
This was the first time I used my new DeWalt 4.5" diamond bladed heavy duty small angle grinder...could be the last too.
I bought this rock for $5 from a local brickyard. They had 4 of them in the scrap heap because they had "misinterpreted" the specs. I thought it was a good deal so I bought two.
Notice that it is deeper in the middle on one side. I originally thought that this would be the drain for the birdbath (the ear canal).
So I flipped the rock over and scretched in the outline of the ear on the other side.


I opened the new grinder and proceeded to make a mess.
No one told me "don't try this at home". Full face mask and respirator are mandatory.
After half the cuts were made in the garage, I moved outside to the back yard and sought the aide of Darth Vader.
Lesson: Grinders turn limestone to dust.


The cuts have been made so I just knocked them off. Then I noticed that if I left the bottom intacted the thing would stand up. The stand was a little messed up but could be salvaged. So now the ear changes from a birdbath to garden "art".


Now it's just a matter of hacking out the stuff that doesn't belong.


Turns out ears in general are far more complicated than I imagined.


Creases lead into folds and folds overlap themselves. I was having a difficult time until I realized that all the creases and folds go around and lean to the hole (ear canal?) and that their main purpose is to support the parts that stick out from the head in order to catch sound waves.


Here's the ear after much sanding and a little more grinding. It still needs work. The model's ear is provided for comparison purposes. Those are the piglets (on the left).


.jpg)


.jpg)
.jpg)


